
Airway Management Basics
The CPR class didn't teach you this. What to do when someone is unconscious but still breathing—and why the next 10 seconds matter.
Beacon Medical Preparedness | Week 2
You're three miles from the trailhead when your hiking partner stumbles and goes down. He hit his head on a rock. He's unconscious, but you can see his chest rising and falling—barely. His breathing is shallow and irregular. You check for a pulse. It's there, weak but present. He's alive, but he's not okay. The CPR class you took five years ago never covered this. What do you do now?
This scenario plays out more often than you'd think in the backcountry. Not every emergency is cardiac arrest. Not every unconscious person needs CPR. But every unconscious person needs airway management—and the difference between doing it right and doing it wrong can be the difference between life and death.
Last week we covered bleeding control. This week, we're going upstream in the ABC chain: Airway. Because if the airway isn't open, nothing else matters.
The Recognition Problem: Is That Breathing or Dying?
The first skill is recognition. Bystanders frequently mistake agonal breathing—gasping, irregular, snorting breaths—for normal breathing. This is catastrophic. Agonal breathing occurs in 40-60% of cardiac arrest cases and is a sign the brain is dying, not recovering.
Here's how to tell the difference:
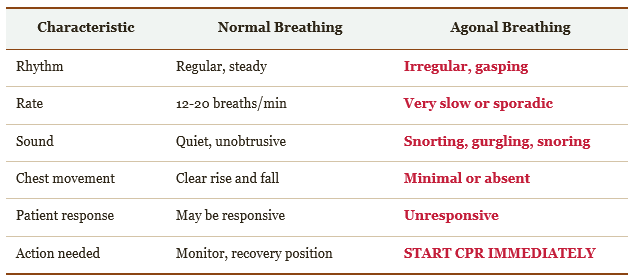
Table 1: Normal vs. Agonal Breathing Recognition
The rule is simple: If you're questioning whether the breathing is normal, it's not. Err on the side of action.
The 10-Second Decision: What To Do Right Now
When you find someone unconscious, you have 10 seconds to make three critical assessments. Here's the flowchart that should be burned into your memory:
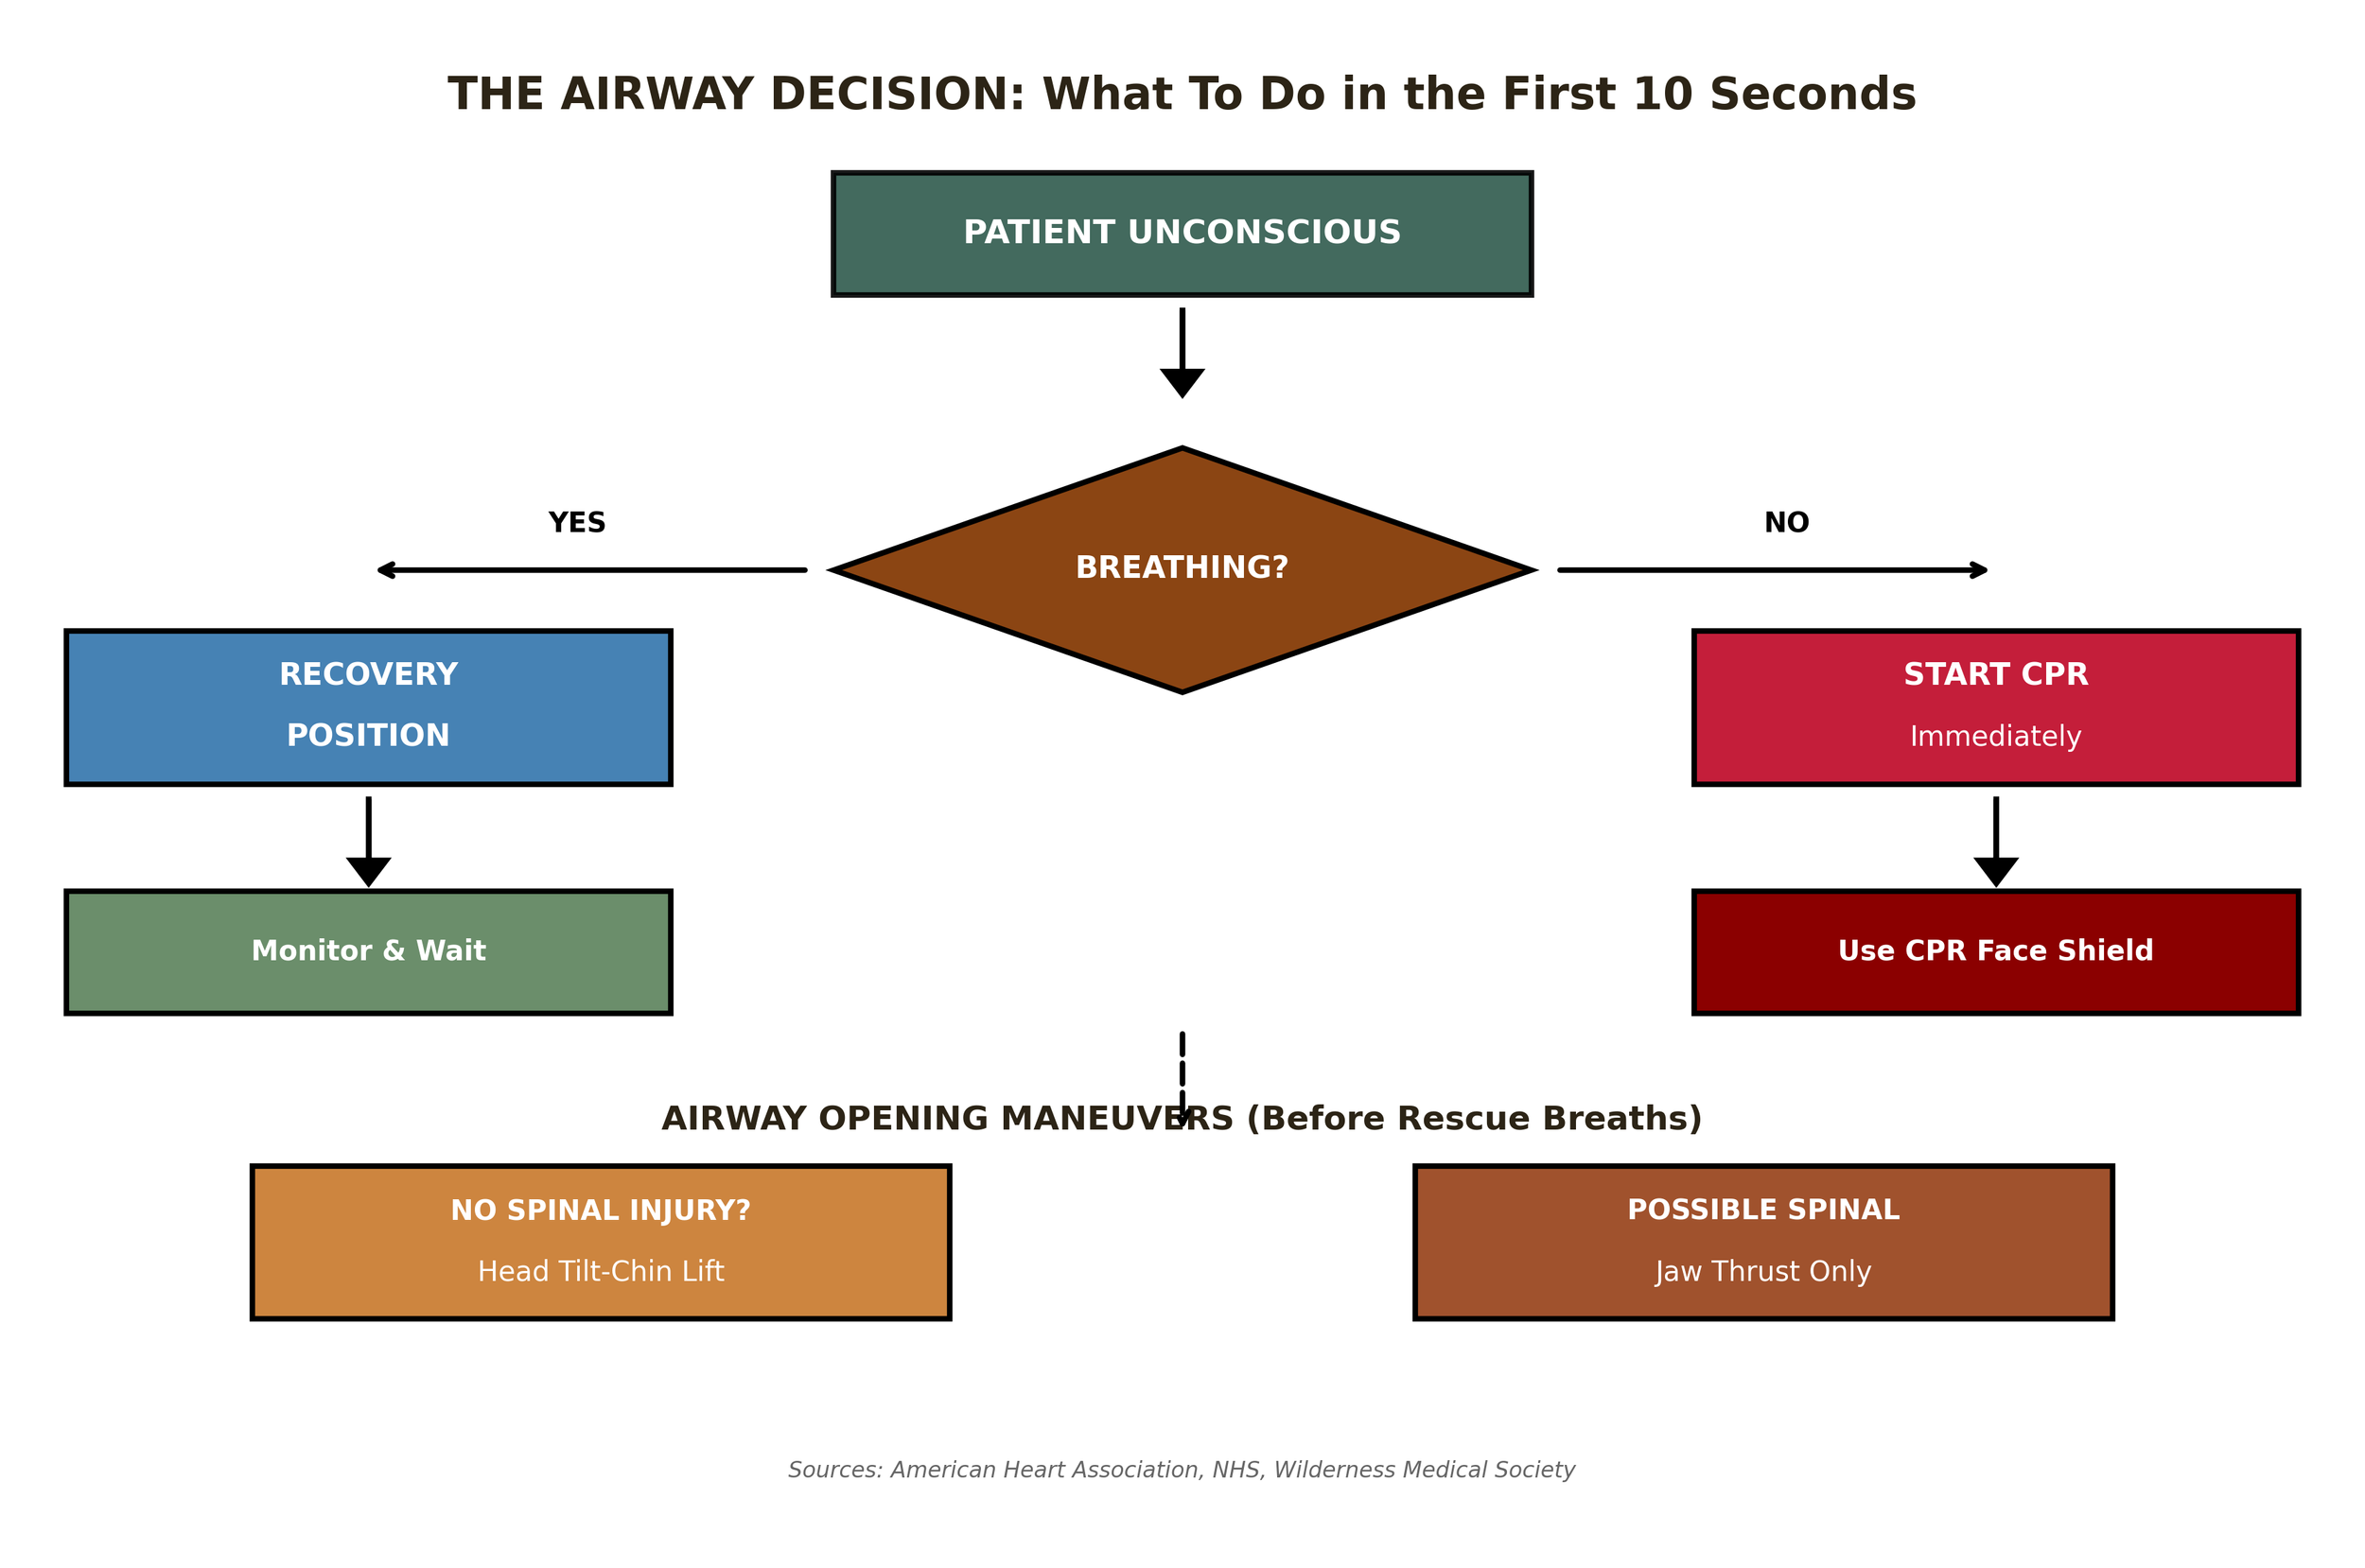
Figure 1: The Airway Decision Flowchart (Sources: AHA, NHS, Wilderness Medical Society)
The decision tree is straightforward, but each branch has critical details that determine success or failure.
The Recovery Position: Your Go-To for Breathing Patients
If the patient is unconscious but breathing, the recovery position is your answer. It keeps the airway open, allows fluids to drain, and prevents the tongue from blocking the throat. Research shows using the recovery position significantly reduces hospital admission rates.
The technique looks simple, but doing it wrong can make things worse. Here's the step-by-step field guide:

Figure 2: Recovery Position Step-by-Step (Field Guide)
Critical Details Most People Miss
• The extended arm (Step 1) acts as a brake—without it, the patient can roll too far onto their face
• Cross the arm over the chest (Step 2) must stay in place during the roll—it stabilizes the head
• Pull the knee, don't push—it's a lever, not a shove
• After positioning, tilt the head back slightly to open the airway and check the mouth for obstructions
The Spinal Injury Exception
If you suspect a spinal injury—fall from height, diving accident, direct blow to the head or neck—do NOT move the patient into the recovery position unless absolutely necessary. In these cases:
• Keep the patient flat on their back
• Use the jaw thrust maneuver to open the airway (details below)
• Only roll the patient if they're vomiting and you cannot clear the airway otherwise
Airway Opening Maneuvers: Before You Breathe for Them
If you need to give rescue breaths—either during CPR or for a patient who's not breathing adequately—you must open the airway first. The tongue is the most common culprit in unconscious patients. When muscles relax, the tongue falls back and blocks the throat.
There are two basic maneuvers, and which one you use depends on one question: Is there a possible spinal injury?
Head Tilt-Chin Lift (No Spinal Injury Suspected)
This is the standard technique when trauma isn't a concern.
Position: Kneel beside the patient's head
Hand placement: Place one hand on the forehead, fingers of the other hand under the bony part of the chin (not the soft tissue)
Tilt and lift: Gently tilt the head back while lifting the chin forward
Check: The mouth should open slightly. Look, listen, and feel for breathing
Critical warning: Never press on the soft tissue under the chin. This can compress the airway and make things worse. Lift the bony mandible only.
Jaw Thrust (Possible Spinal Injury)
When you suspect cervical spine injury, the jaw thrust is your only option. It opens the airway without moving the neck.
Position: Kneel at the top of the patient's head
Hand placement: Place your palms on the patient's temples to stabilize the head. Keep the neck neutral
Finger placement: Place your index and middle fingers behind the angle of the jaw (the mandibular rami)
Lift: Lift the jaw upward and forward. The lower teeth should come slightly above the upper teeth
Maintain: This is tiring. You'll need to hold this position if giving rescue breaths
The jaw thrust is physically demanding and harder to maintain. Studies show it produces comparable tidal volumes to head tilt-chin lift when done correctly, but it's harder to do correctly under stress.
Hands-Only CPR vs. Rescue Breaths: When to Do What
The American Heart Association's Hands-Only CPR campaign has saved countless lives by removing the barrier of mouth-to-mouth contact. But it's not always the right choice.
Use Hands-Only CPR For:
• Adults and teens who collapse suddenly (likely cardiac cause)
• When you don't have a barrier device
• When you're unwilling or unable to give rescue breaths
Use CPR With Rescue Breaths For:
• Children and infants
• Drowning victims
• Drug overdose cases
• Anyone who collapsed due to breathing problems
In the wilderness, drowning and environmental exposure are common. That means rescue breaths are often necessary. Which brings us to the Beacon Pro.
KIT CHECK: The Beacon Pro Airway Essentials
The Beacon Pro includes the critical equipment for basic airway management:
CPR FACE SHIELD:
- One-way valve prevents backflow of fluids
- Clear barrier allows visual confirmation of breath delivery
- Compact, always ready in the Trauma Pouch
- Why it matters: Bystander hesitation kills. Studies show people are 70% less likely to perform CPR without a barrier device. The face shield removes that barrier.
NITRILE GLOVES (2 pairs):
- Protects you from bodily fluids
- Protects the patient from bacteria on your hands
- Always put them on first
TRAUMA SHEARS:
- Cut clothing to expose the chest for CPR
- Cut away obstructions around the neck
WHAT'S NOT INCLUDED (AND WHY):
The Beacon Pro doesn't include NPAs or OPAs—these require training to use safely and are outside the scope of basic first aid. The techniques in this article work with zero equipment beyond what the kit provides.
SKILL TO PRACTICE: Time yourself putting on gloves, opening the CPR face shield, and positioning yourself to begin compressions. Under 30 seconds is your goal.
The Wilderness Reality: Complications You Can't Avoid
Classroom scenarios are clean. Wilderness emergencies are not. Here are the complications you'll face:
Vomiting
Unconscious patients vomit. It's not a question of if, but when. If a patient in recovery position vomits, roll them further onto their side, clear the mouth with your gloved fingers, and reposition. Don't wait for them to finish—act immediately.
Cold
Hypothermia complicates everything. Cold patients have slower metabolisms and can survive longer without perfusion—but they're also harder to assess. Check for breathing for a full 10 seconds. Cold can slow everything down.
Positioning on Uneven Ground
The recovery position assumes flat ground. On a slope, position the patient so fluids drain downhill. On rocky terrain, use clothing or a pack to support the head and prevent it from hanging at an awkward angle.
The Group Dynamic
Someone needs to manage the airway. Someone else needs to call for help. If you're alone, the math is brutal—you can't do both simultaneously. In the wilderness, this is where a satellite communicator becomes as essential as the CPR face shield.
The Practice Challenge: Build Muscle Memory
Reading this article is not training. You need to feel these movements in your hands. Here's your homework:
Recovery position timing: Practice on a willing partner. Time yourself from kneeling to fully positioned. Under 30 seconds is your goal.
Blindfolded practice: Have your partner lie down while you're not looking. Turn around, assess breathing in 10 seconds, and execute the appropriate maneuver.
Jaw thrust endurance: Hold the jaw thrust position for 2 minutes. Feel how tiring it is. This is why spinal injury scenarios are so difficult.
Kit drill: With your Beacon Pro, time yourself: gloves on, CPR face shield out, positioned to begin. Under 30 seconds.
The goal is unconscious competence. When your buddy is unconscious at your feet, you don't want to be thinking. You want to be acting.
Sources & References
American Heart Association. "Hands-Only CPR FAQs." https://cpr.heart.org
American Heart Association. "Part 3: Adult Basic and Advanced Life Support: 2020 Guidelines." Circulation. 2020;142(16_suppl_2):S366-S468.
Cleveland Clinic. "Recovery Position First Aid." https://my.clevelandclinic.org
NHS UK. "Recovery Position - First Aid." https://www.nhs.uk
Wilderness Medical Society. "Wilderness Airway Management." https://wms.org
Life Support Systems. "Agonal Breathing: Signs, Causes & What To Do." https://lifesupportsystems.com
MSD Manual Professional Version. "Head Tilt-Chin Lift and Jaw-Thrust Maneuvers." https://www.msdmanuals.com